The Sims 4 Building Tutorials:
Making Nice Roofs
by Norma Blackburn

Click to Enlarge. Many builders falter when it comes to building a roof on their Sim houses, but it needn't be a chore.
Roofs
With the base game, we are somewhat limited in the available roof pieces, but as the game progresses, more choice may be added. For now, we have eight choices of roof pieces made up of four different pieces and then a diagonal version of each one.
Gabled Roof
A basic roof, the gable can form the basis of many different roofs and is characterized by a triangular section of wall on two ends with two sloped roof sections.
Half Gable
As the name suggests, it is half of a full gable with only one roof section. The half gable is useful where a lower level of the building extends out from the upper level. A half gable can be placed against the upper wall.
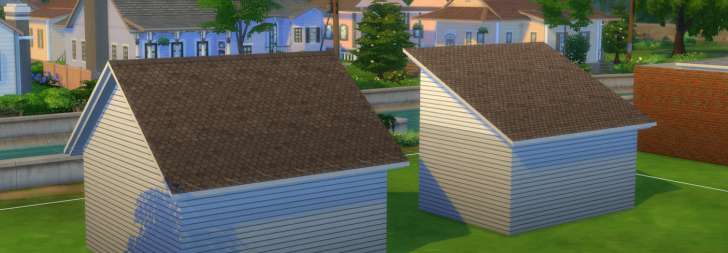
Click to Enlarge. A gable and a half gable roof
Hipped Roof
The hipped roof has four sections of roof. On a square building, the four pieces will meet at a point in the middle and on a rectangular roof, the two longer pieces will meet along a ridge with a smaller piece at each end.
Half Hipped
Half of a full hipped roof with only three roof pieces, the half hipped is similar to the half gable and useful for butting up against a wall.
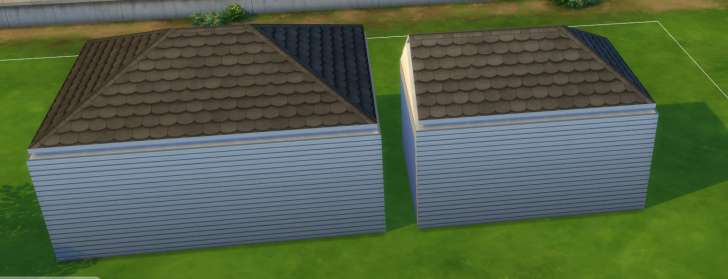
Click to Enlarge. A hipped and a half hipped roof
Flat roof
Although the game does not actually offer us a flat roof option, we can still achieve that look if desired. To add a flat roof to a building, you will need to add an empty room on the upper level. This room needs to be the shape and size of the desired roof, so you may need to combine several empty rooms together. Once there is a room on the upper level, you can add floor covering and a wall trim to the outer edge.
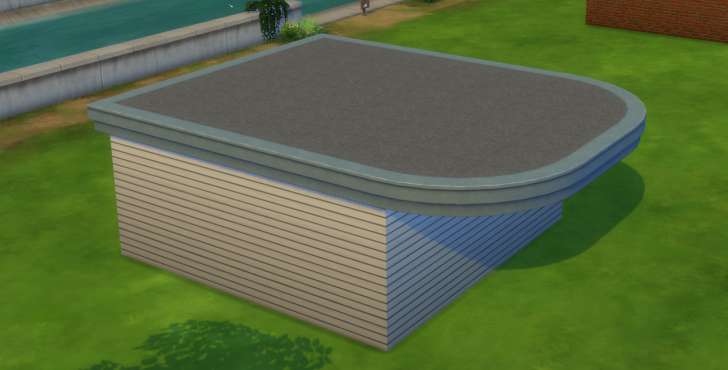
Click to Enlarge. An empty room on the floor above together with a wall trim makes an interesting roof
Combine Roof Pieces
A lot of buildings are not squares or rectangles and the roof cannot be made using just one piece of roof. We will often have to combine different pieces to get a more realistic looking roof and one that is visually pleasing. The simplest combined roofs consist of just two pieces of the same roof type.
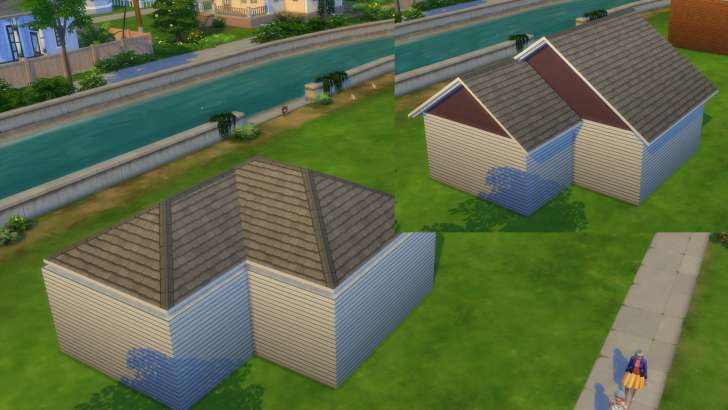
Click to Enlarge. Two simple combined roofs
More advanced roofing consists of a combination of different roof pieces. Have a look at pre-built houses in the game and study the way the roof is made, most often by combining several pieces. Another trick, is to look at buildings in the real world and try to visualise how it would be made using the sections available in the game. A little later on, we'll have a look at creating some different roof types.
Adjusting the look of a Roof
There is a little more to building a roof besides placing the right piece or pieces. There are adjustments we can make that can make a small or large difference. Note that any type of adjustment takes effect only on the section of roof highlighted. If your building contains multiple roof sections, you will need to adjust each piece.
Height adjustment
Adjusting the height is something we can do on all roof types and is as easy as grabbing the up pointing arrow when we highlight a roof section. Pull the roof up or down to the desired height and repeat with any other roof sections. With combined roof sections, try to match up the height so that the joins are not visible and the ridge capping flows smoothly from one piece to the next.
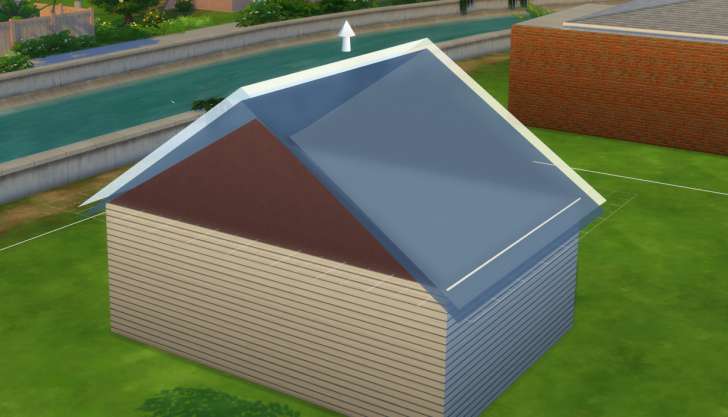
Click to Enlarge. Adjust the height of the roof by pulling the arrow up or down
Changing the Bow
By default, roof pieces have straight pieces of roof, that continue from the top of the roof to the outer edge in a straight line at an angle that is determined by the height of the roof. We can alter this however by grabbing the bow tool, which appears as a ball when we select a roof piece. Pulling the ball up will result in the roof section having a convex curve. The degree of curve is determined by how high you pull the ball up. Pulling the ball down will result in a concave curve.
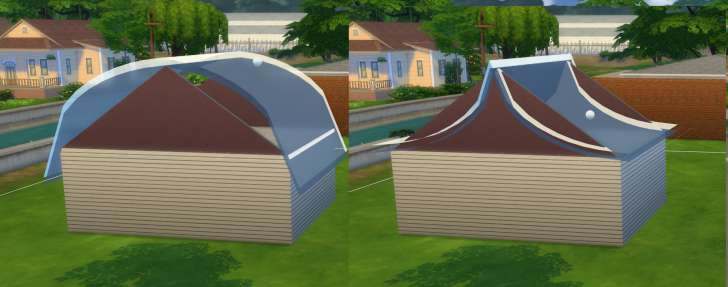
Click to Enlarge. Adjust the bow of the roof by pulling the ball up or down
Changing the Eaves
Another alteration we can make is to change the length of the eaves, that's the roof that overhangs past the wall. We can only make this adjustment on gable and half gable pieces. When we select a roof piece, there will be a small arrow at each corner following the direction of the roof slope. Pull this arrow away from the roof or push it back towards the roof to adjust how much overhang there is on that piece. This will adjust the eaves on both sides of the roof. If you want to adjust one side, hold the shift key while making the change.
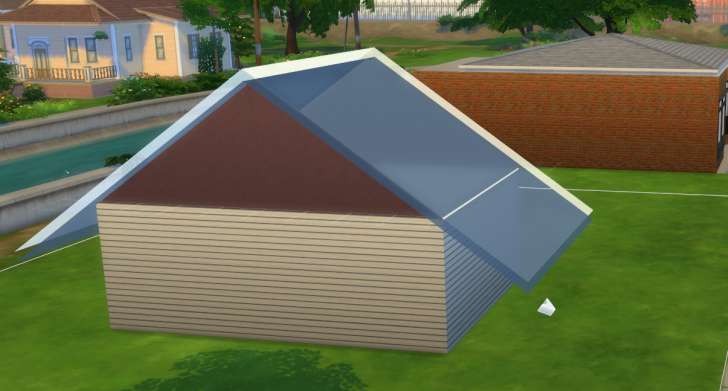
Click to Enlarge. Adjust the length of the eaves by pulling the arrows away from the roof
Trims
Adding a trim to the roof adds that finishing touch and can hide what may have been an unattractive area where roof meets wall. Hover over each trim to access the color palate for that trim and make a selection. Once selected, just click anywhere on a section of roof to apply the trim. You will need to add the trim to each roof piece separately.
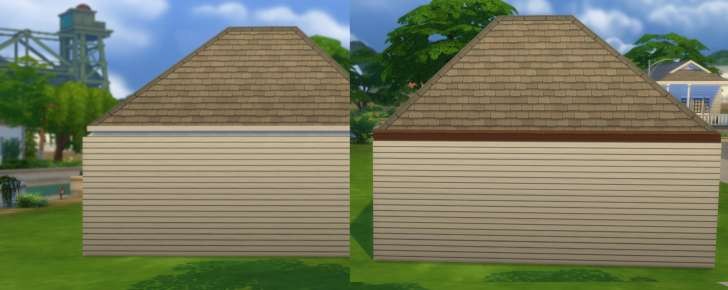
Click to Enlarge. Roof without trim and with trim
Different Roof Styles
With the different types of roof pieces coupled with the different adjustments that can be made, we are presented with numerous different roofs. Here are some varieties of roof and how to achieve them. Note that these instructions are for the basic creating of the roof types, you may need to adjust roof heights to get the desired look.
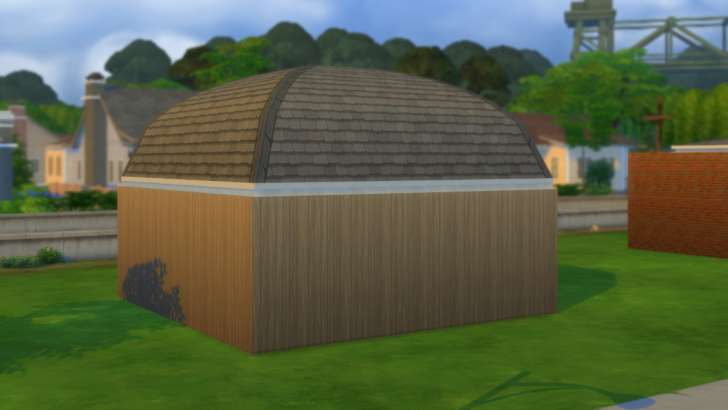
Click to Enlarge. Domed Roof
This is the closest we get to a domed roof at the moment in the game. It is simply a hipped roof that has the bow pulled up into a high convex curve.
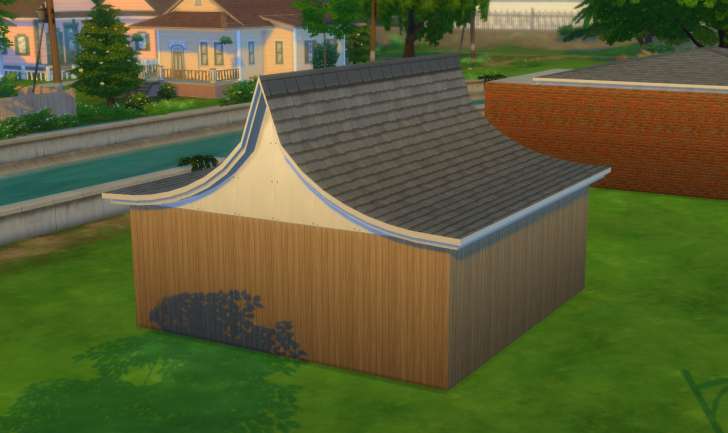
Click to Enlarge. Pagoda Roof
Add some Asian flair to your buildings with this roof. It's just a gable roof with the bow pushed down to form a concave curve.
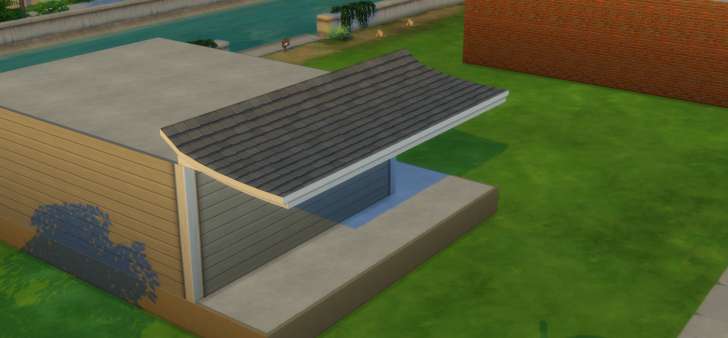
Click to Enlarge. Awning Style Roof
This style is good over a porch, however, it does not go well around a corner. Use a very low half gable roof and pull into a concave bow.
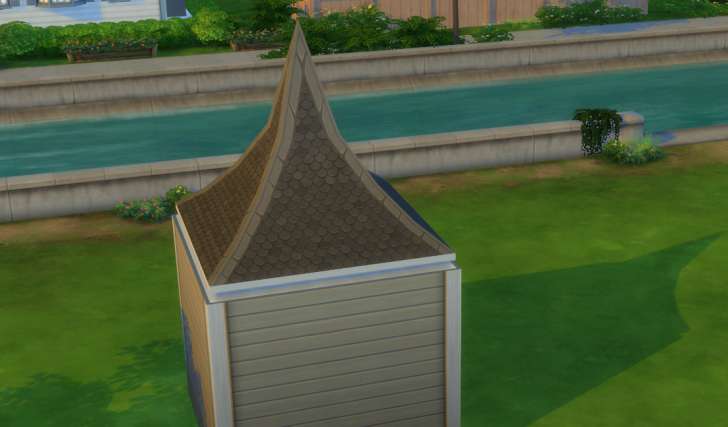
Click to Enlarge. Simple Tower Roof
Seen on the tower of the Goth house in Willow Creek, this is made simply with a hipped roof. Pull the height up as far as you want and then adjust the bow into a concave curve.
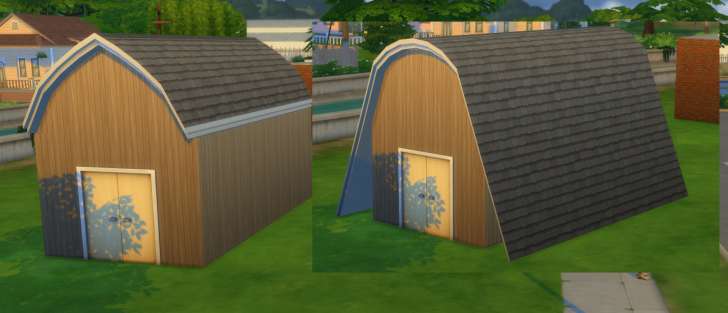
Click to Enlarge. Gambrel and Barn Roof
These two both start with a tall gable roof. Adjust the bow to form a convex curve. For the barn type roof, pull the eaves down to touch the ground.
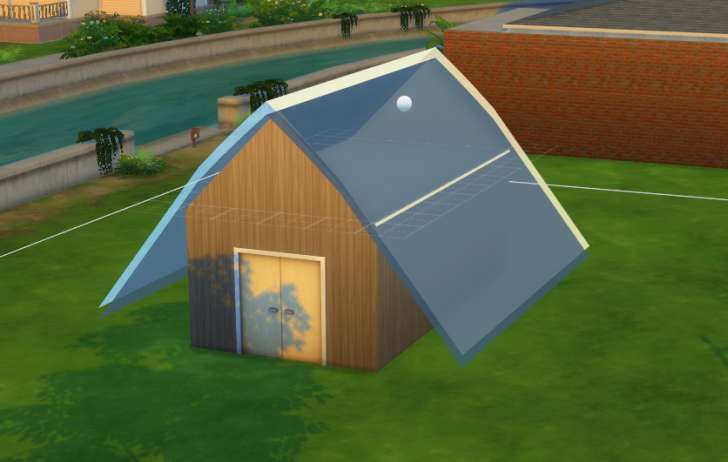
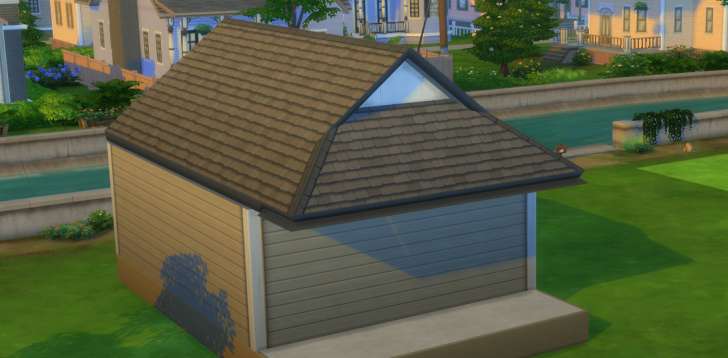
Click to Enlarge. Gablet or Dutch Gable
This style of roof is seen a lot in Willow Creek and is very easy to make. It is simply a gable roof with the gable ends at the front and back with the front end set back a few squares from the front. A half hipped roof is then stretched from one side to the other at the front. The eaves of the gable roof need to be pushed up to match the (non-existent) eaves of the half hipped roof.
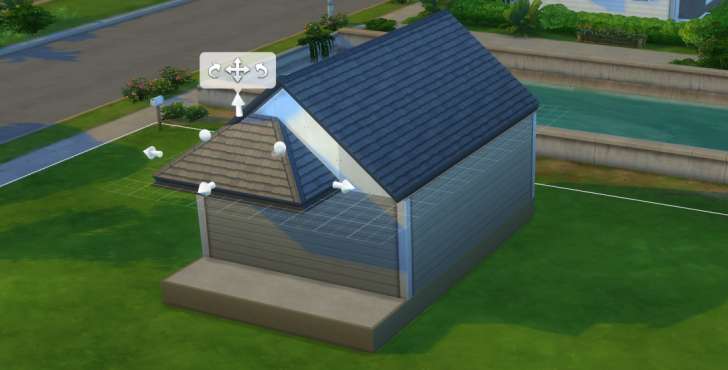
Click to Enlarge. Start with a gable and then stretch a half hipped across the front
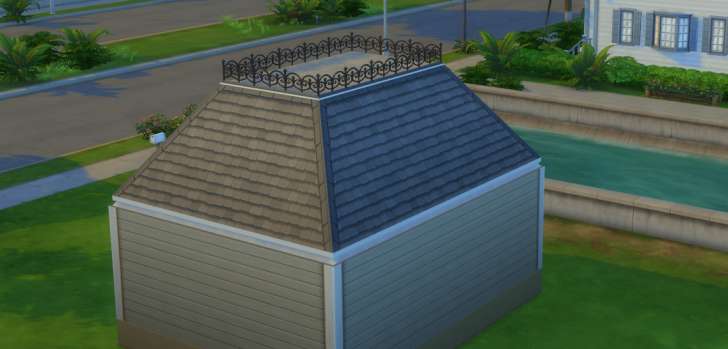
Click to Enlarge. Mansard
Best built on square or rectangular buildings, start with a room on the roof level, two or three squares in from the edge.
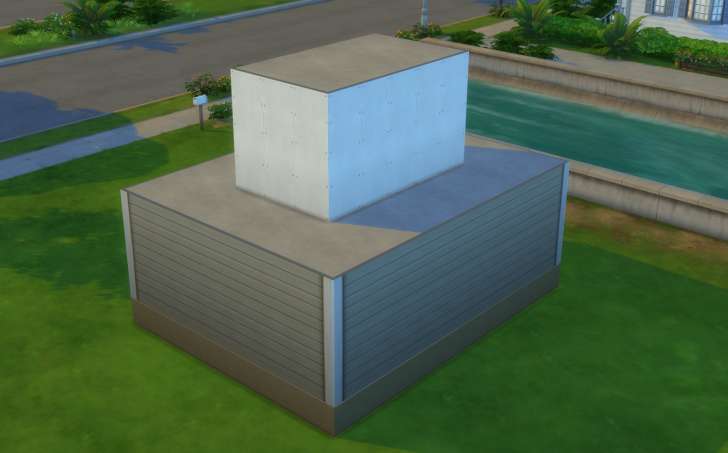
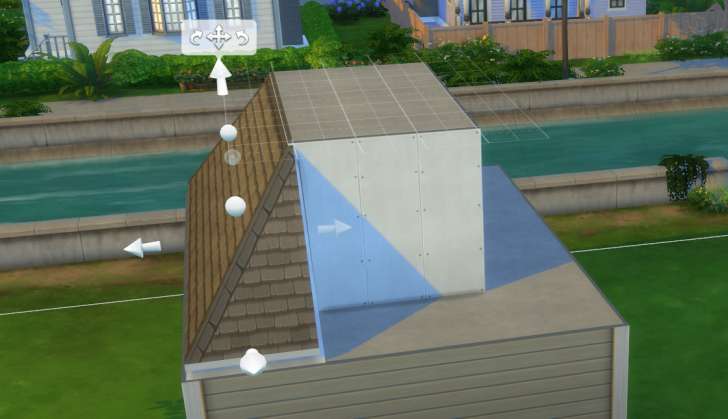
Add a half hipped roof along one edge. Adjust it to be flush against the wall of the room and pull it up to the same height. Repeat on all four edges.
Finish with trims and a small fence around the top if you want.
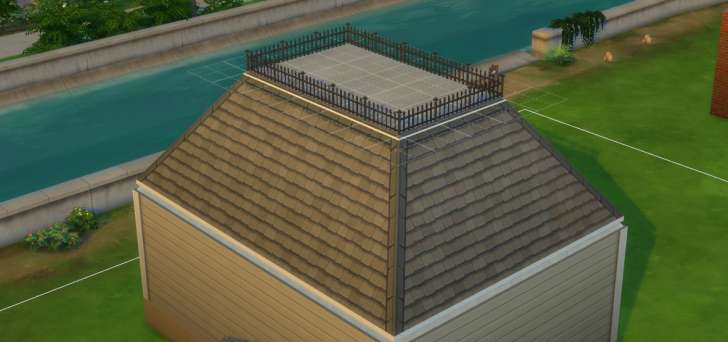

Click to Enlarge. Clearstory Roof
An interesting roof that is designed to let light in while retaining privacy. Unfortunately, the windows don't let in much light in game. This roof is made up of two half gables of different heights. The eaves need to be pulled right back and you will need to use the moveobjects cheat to add the windows.
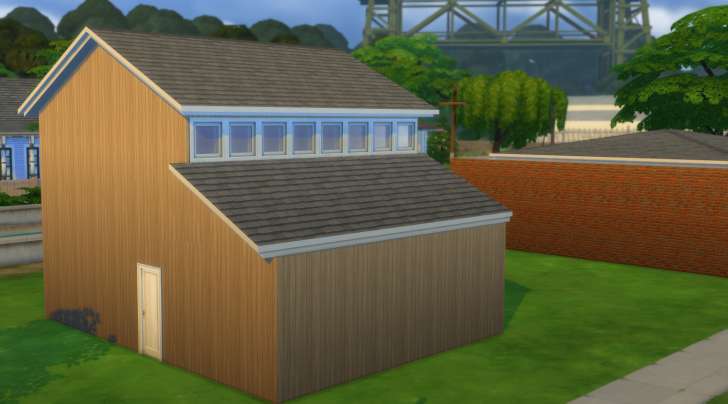
Click to Enlarge. Clearstory Roof 2
This roof is similar to the first Clearstory roof, but is used on a building with two levels. The windows let light into the upper level and depending on the height of the lower section of roof, there is often no need for a cheat to place the windows.
Start with a two storey building with the upper level not as wide as the lower section. Add a gable roof to the upper section and a half gable roof to the lower section. Add windows to the wall above the lower roof section.
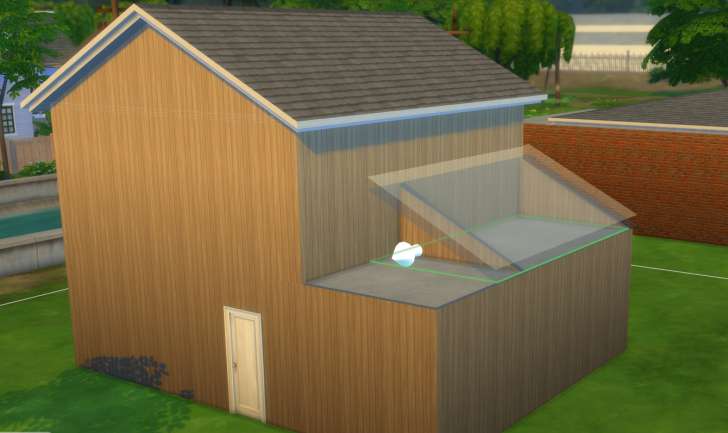
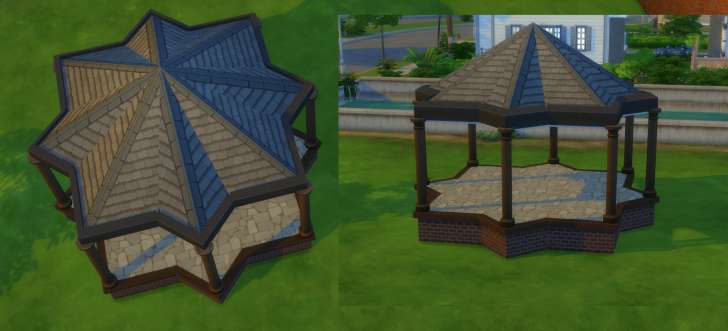
Click to Enlarge. Almost Round Roof
At the moment, we don't have any round roofs, but with a little bit of creativity, we can get something close. This gazeebo roof was made using two square hipped roofs - one regular and the other diagonal. This one was made with a four by four roof and should work with any size as long as there is an even number of grid squares along the side. Place the two squares on top of each other and adjust the height so they are both the same.
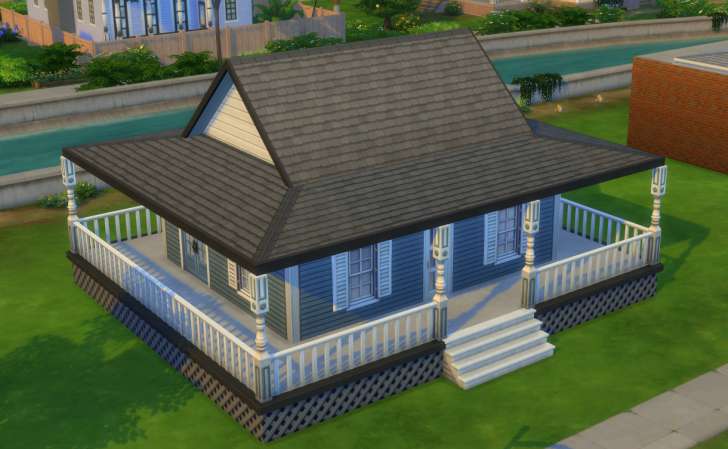
Click to Enlarge. Full Wrap Around Porch Roof
The wrap around porch and its roof is often seen on country homesteads. Begin with a half hipped roof dragged out the full width of the house and porch.
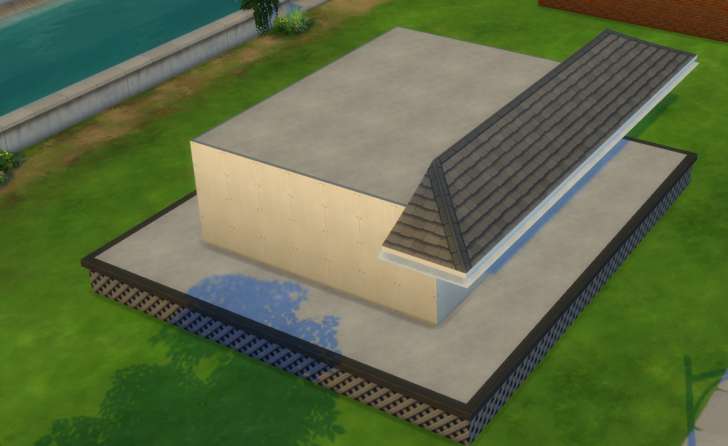
Add a second half hipped roof along the next side of the house overlapping the first piece at the corner. Make sure both pieces are the same width and height so that the ridge capping matches up.
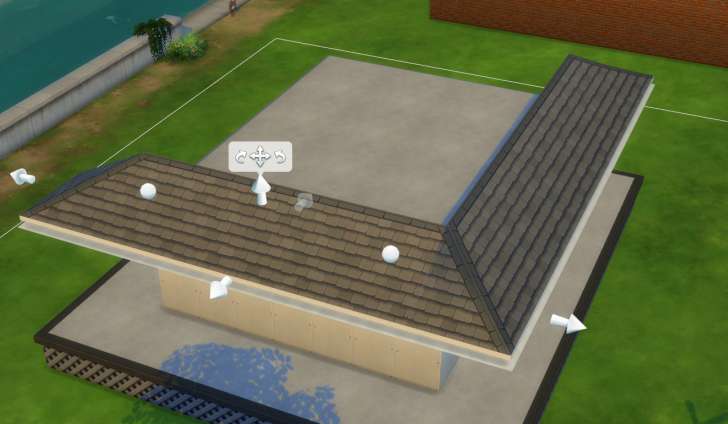
Continue in this manner on all sides of the house so that all of the porch has a roof.
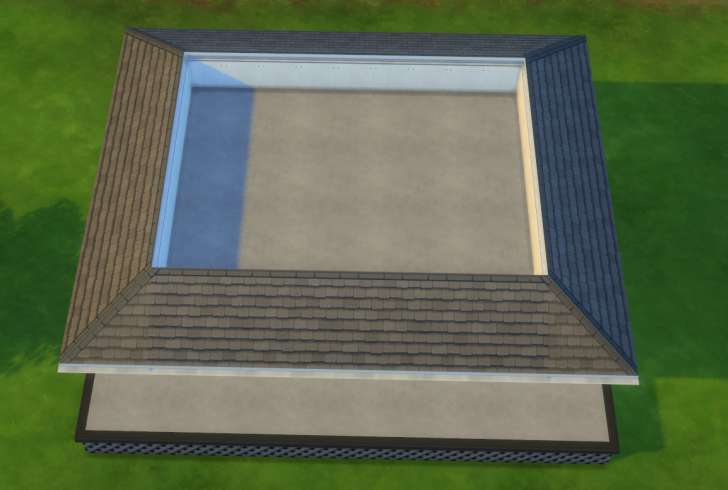
Add a full roof section in the centre to cover the house. I've used a gable roof here, but you can use a hipped roof, it depends on the look you want.
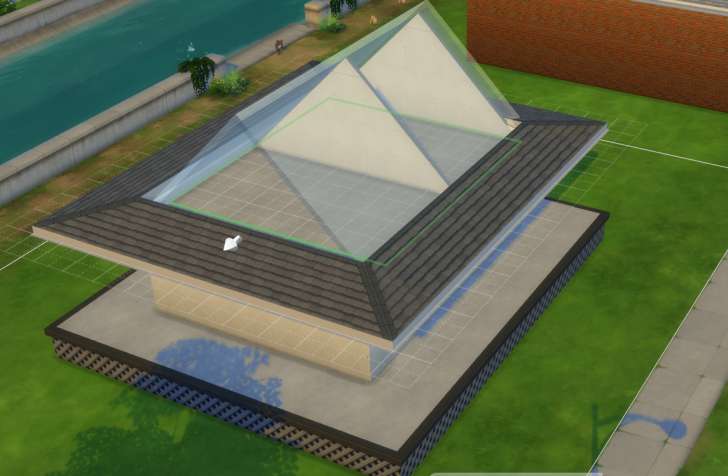 Add roof trims and play around with different roof heights until you are happy with the look. You will get a nicer join between the main roof and the porch roof if you drag the inside edge of the porch roof in one square so that the main roof and the porch roof pieces overlap by one square.
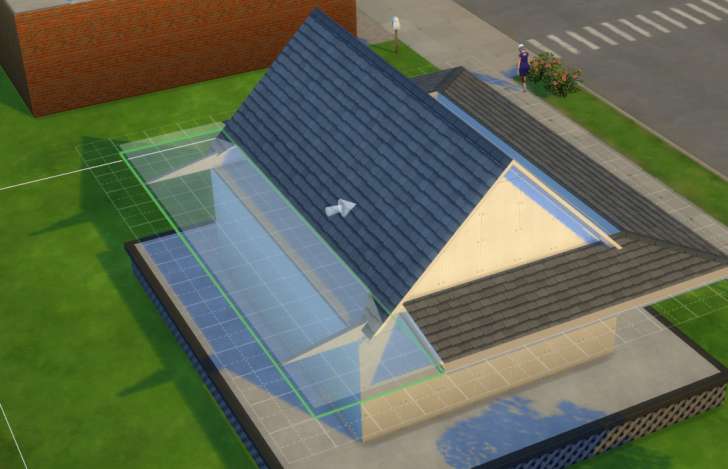
Click to Enlarge. Drag the porch roof pieces in one square so they overlap the main roof piece
If the porch roof is not going all the way around the building, there are a couple of ways to end the porch roof as seen in the next image.
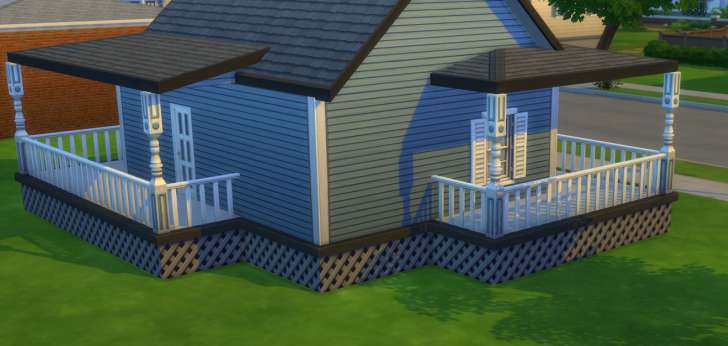
On the right hand side, we have just used the half hipped roof and ended it where the porch ends. On the left, we have a slightly different finish that I think looks a little better.
Add a half gable over the end of the half hipped roof section so that it ends with the porch.
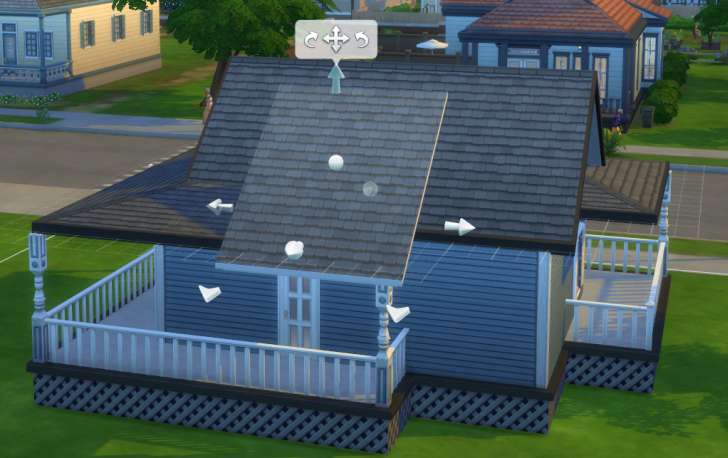
Lower the half gable piece to match the rest of the porch roof and pull the eaves right in. Finish it off with the same trim that was used on the rest of the roof.
If your porch has in inside corner, it easy enough to add a roof to it too.
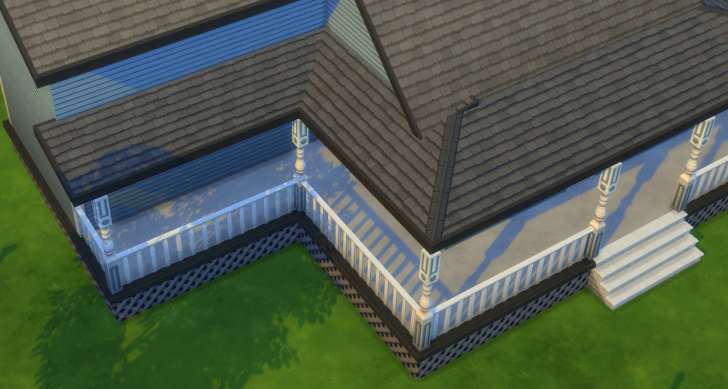
Use a half gable piece and have it start at the wall and continue till it just overlaps the half hipped roof at the front. Lower it to the same height and pull the eaves in.
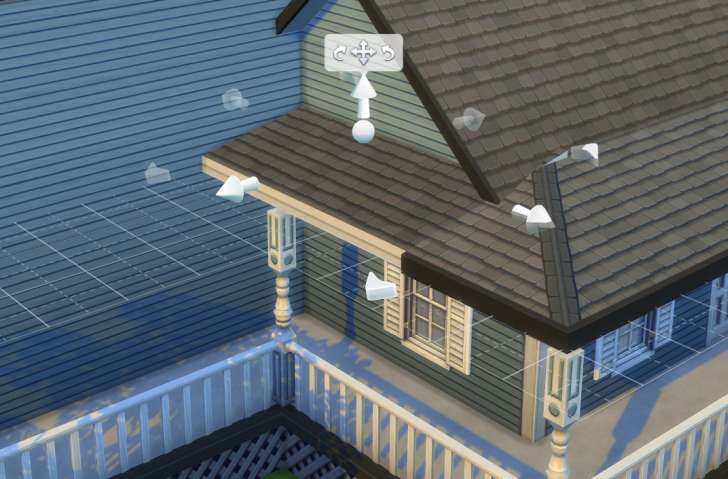
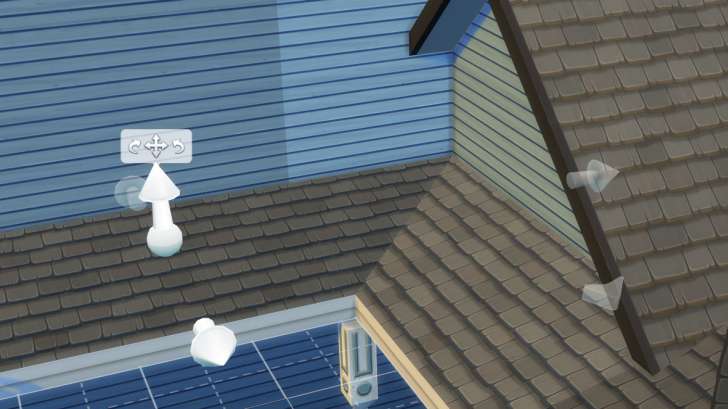
Add another half gable over the last area of porch. Pull the eaves in and lower it to match the other pieces. When it is the same height as the other piece, you will have a nice corner join. Finish it off by adding the trim.
Learn More
- Cheats - Gameplay, testing, and building cheats
- Careers - All job levels, promotions and rewards
- Skills - All skills, ideal moods, and their benefits
- Expansions, Stuff, and Game Packs - All Sims DLC Features
- Babies - Caring for an infant in The Sims 4
- Children - School grades and child skills
- Tips - Gameplay tips and tricks
- Sims' Needs - Caring for your Sims
- Money - Ways of making money in The Sims 4
- Building Tutorials - Learn tricks to make your houses look great.
- Get to Work: Open for Business - running a business
- Emotions - Getting your Sims in the right mood
- Relationships and Weddings
Warning: require(/var/www/test.carls-sims-4-guide.com/comments/includes/commentics.php): failed to open stream: No such file or directory in /var/www/test.carls-sims-4-guide.com/tutorials/building/roofs.php on line 252
Fatal error: require(): Failed opening required '/var/www/test.carls-sims-4-guide.com/comments/includes/commentics.php' (include_path='.:/opt/remi/php72/root/usr/share/pear:/opt/remi/php72/root/usr/share/php:/usr/share/pear:/usr/share/php') in /var/www/test.carls-sims-4-guide.com/tutorials/building/roofs.php on line 252


